First off, I am so sorry for having been gone so long! It’s
been ages! However, I am back now and I have an Easter nail art to make up for
it which I hope you’ll all enjoy!
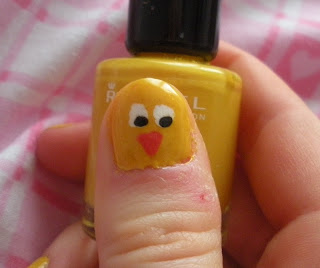
So I was sat up last night at like midnight or something and
felt like doing my nails, and came up with this Easter Chick design. It’s
really, really simple to do so perfect if you have a spare 20 minutes and fancy
taking a break from eating Easter Eggs!
To create these little Easter chicks is ridiculously simple
so here are the quick steps:
1.
Paint your nails yellow. Yes, I know, yellow is
not a colour you generally reach for to paint your nails but in this case, it’s
the perfect colour. However, if you don’t have a yellow, you could go for a
cream, a neutral or a pale pastel colour- experiment and see what you think
looks good. I used Rimmel London’s I <3 lasting finish in 055 sunshine,
which I’ve had for quite a while now so I don’t know if they still do it, but I’m
sure there are plenty of other yellows around.
2.
Grab a cocktail stick/toothpick/nail art pen and
dip it into some white nail polish. Then use the tip of the cocktail stick, or
whatever it is you’ve found to use (hairgrips work quite well actually too) to
dot two little white circles next to each other near the top of each nail.
3.
Then, whilst the white is drying, take your
cocktail stick and dip it into some orange nail polish. Or, if you don’t have
any orange nail polish, because I know it’s not that much of a common colour,
you could use a red or pink instead. Then use your cocktail stick to dab a
little triangle in the centre underneath the two white circles you have
created. The easiest way to make a triangle is to do three dots and just sort
of merge them together.
4.
Then, take your cocktail stick and some black
nail polish and add little black dots onto each of the white dots, creating
little eyes!
5.
Add a quick topcoat of clear nail varnish and
you’re all done! Perfect Easter Chick Nails!
Then, if you wanted to get even more creative, you could add legs at the bottom of your nails for the chicks. Or, you could use this to create other animals. For instance, if you change the background colour to grey, change the nose from an orange triangle to a black circle, and add a mouth with some two white rectangles for teeth, you would have an Easter Bunny!
I hope this gives you some inspiration for your own nails -
whether you choose to follow my design or get creative with your own design!
I will be back soon, but for now, have an EGGcellent Easter
Sunday (I’m sorry- I had to add in an Easter pun somewhere!), make sure to eat
your own weight’s worth of Easter chocolate and have fun creating your nail
designs!
xxx


